The World Of RC Helicopters is one that will continuously captivate, challenge and excite anyone who ventures into it. This blog logs my experiences, adventures and projects with the hope that it will inform, entertain and hopefully help some of my fellow pilots.
Well after the main frame replacement I thought I would give a very quick update.
Having
completed the replacement of the main frame I had left it that I had
levelled the swashplate by eye with final adjustments to be made using
the trims if necessary.
Well when I took it out the
other day, we finally got a window in the weather in my little corner of
the UK, I expected to be having to make trim adjustments but to my
surprise everything was spot on and the little heli flew like a dream
straight off, which was very pleasing.
Now for those of
you who are longing for the Summer and, hopefully, long days of good
flying weather here is just a teaser of a little Italisan sunshine:
For some at least the 2010 Heli Smackdown clearly went with a real splash!!!
I
hope that cheered you up if you have been suffering from Winter blues.
On the optimistic side, and I like to think of myself as an optimist,
the great thing about this time of the year is that we have the whole of
Spring and Summer to look forward to. Here in the UK, this week we have
a little tempting glimpse and a few signs that Spring is just around
the corner. During the day we have had some pleasantly warm sunshine and
believe it or not on March 1st I actually got a chair out and had my
lunch sitting out in the garden...a first for this year at least!
I hope you all enjoy a great Spring and Summer, with lots of great fying weather, wherever in the world you may be.
Something that I had not anticipated with the Eflite Blade mCPx collective pitch RC helicopter was the possibility that I would be replacing the main frame. Short of breaking the body mounting posts (which I had managed to break one on the Blade mSR but had repaired that with a the use of appropriate glue) there seemed little that might call for it. However, what I had not considered was that the main frame might need to be replaced not because of damage to the main frame itself but the attachment of a component to it.
Video courtesy of BrainShaw33
The damage must have occurred after a particularly heavy meeting with the ground recovering from inverted, although I must say I had not noticed it at the time as I called it a day with that unscheduled landing as I was aware that the batteries were low. The damage that had gone unnoticed initially was to the two posts that come vertically out of the landing gear to mount it in the main frame. These had both split near their base but neither had come broken clean off. It was only the next time that I tried to fly the mCPx that it became apparent that something was amiss as the helicopter was very unstable and pretty quickly came down. Close inspection then revealed that one of the posts had broken off while the other was near to doing so. Not of itself a problem, just pick up a new set of landing skids and you are away again.
When you realise that the post has broken off right at the base with the post itself still wedged in the main frame things are not so straightforwards; at least not when you discover that the little plastic post can not be coaxed out by pulling or levering it and is even resistant to any attempts to drill it out.
At that point the only remaining option is to get a new main frame as well as a new set of landing skids.
So a few days later the items have arrived - together with one of the new tail rotor blades for the V2, which I thought I would get to try while I was ordering. These have a wider blade with a greater pitch angle on it to provide better tail holding capabilities, or so they claim.
So with all parts at the ready I proceeded to set about the job of changing the main frame. You will need good light and if your eyesight is not 100% then probably a magnifying glass as the parts are tiny. Neither is it a job for anyone who is all thumbs!
The first step is to remove the tail boom and disconnect the tail motor plug from the main board. The boom comes free without too much trouble if you give it a sharp pull. I recommend that you first unplug the tail motor because giving a sharp pull on the tail boom can lead to it jolting away quite rapidly leading to you yanking the cable from the tail motor to the main board. The result may be damage to the wiring or the plug.
That done and the canopy removed I moved onto removing the main shaft. If you take the main gear off and disconnect the 3 pushrods from the swashplate the main shaft will then lift out complete. It is also necessary to remove the top and bottom bearings from their housing in the main frame. It is wise to note which way round they sit when doing so. I would describe them as having a closed side (has larger flanges) and an open side (whereby you can see more of the bearings). In each case it is the 'closed' side which faces out when located in the main frame.
After that the servos can be removed. I left all of these plugged into the main board. This seems to be the simplest option but alternatively you could unplug them, having first clearly marked which one goes where. I also left the servo pushrods in their respective servos, although these can quite easily drop out.
The first servo that I removed was the elevator servo, located to the
rear of the main frame. This is actually the most fiddly of the three
due to its location within the main frame, whilst the 2 lateral cyclic
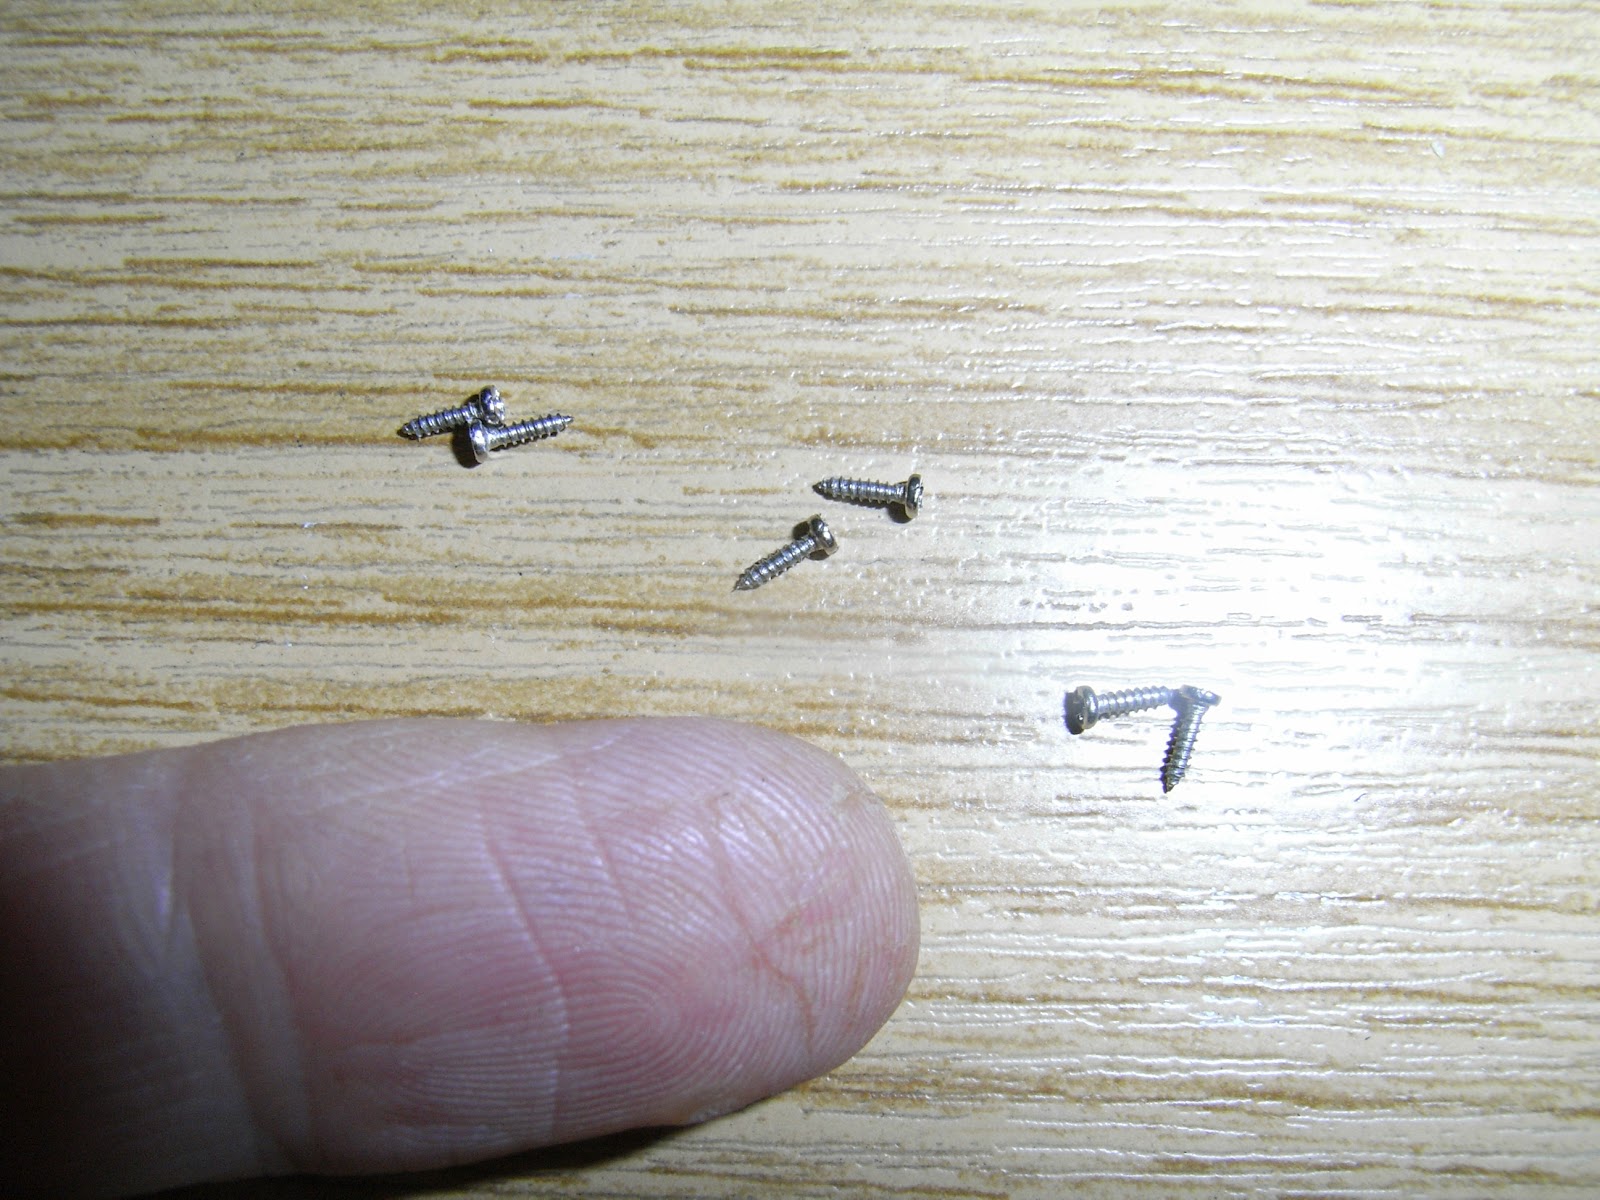
servos just screw onto the open sides. Each servo is located with 2
diagonally opposite x-head screws which can be easily removed with the
jewellers screwdriver provided with the model. The other opposing corners are just pushed onto plastic locators on the main frame, or in the case of the 2 side servos there is only 1.
The screws are rather tiny, as can be seen in this picture, so care is needed not to lose any.
Having removed the three servos I next removed the main board. This is again held in place with 2 screws, each with their own washer so that the screws can be bedded down firmly without damaging the more fragile material of the main board. These two screws are also longer than those used to locate the servos.
Next the main motor can be unscrewed. Again two hex screws hold it in place (Note these are short, stubby screws). Then the motor can be slotted out from its quite tight housing.
That done you are left with the old main frame separated from its fixtures.
All the parts attached to the main frame are held in place by a sum total of 5 pairs of screws.
One new main frame waiting to be made up into a 3D flying machine.
Putting it all back together again in the main frame is basically a reverse of the above process of taking it apart.
I started first by attaching the main board, remembering that the copper wire from the main board wraps around the canopy support arm on the left side.
Then in goes the motor, followed by the two lateral cyclic servos. Just make sure that you get the servos on the correct side or your swash plate movements will be reversed.
When it comes to replacing the elevator servo at the rear there is a definite trick to it. It is necessary to ensure that the servo pushrod is attached to the servo BEFORE you put the servo back. There is no way to do it afterwards. Furthermore the servo pushrod has to be the right way around. The pushrod should be on the inside with the short hooked end on the outside.
Correct placement with the servo pushrod arm central and the hook to the outside.
Incorrect placement with the servo pushrod arm on the outside.
Having made sure that the servo pushrod is correctly attached to the servo the next point is to ensure that when putting the servo back in place that you lead with the servo pushrod, slotting it through the oblong plastic frame opening on the top between the upper main bearing, to the front, and the tail boom mount to the rear.
With that done the fitting of the main frame is all but complete.
All that remains now is to put the complete main shaft back on, re-attach the servo pushrods to their respective ball ends and replace the tail boom. When replacing the tail boom wrap the motor wire back along the top of the tail boom so that when the boom is pushed back into the main frame the wire slots into the grove for it above the tail boom hole.
Next ensure that the swash plate is level. The pushrods may have changed length if the ball links have become screwed on more or less in the process. Further, there is no guarantee that the two mainframes will be identical and if the servo locations are slightly different the servo pushrod lengths will need to be changed. It is then a matter of attaching a LiPo to provide power in order to centre all the servos. The length of the various servo pushrods, respectively, can then be changed as required by screwing the ball links on or off a turn or so until the swash plate is level in all orientations.
If unable to get the swash completely levelled by eye by adjusting the pushrods, as these may not make fine enough changes on such a small helicopter, then it can be fine tuned using the sub-trim of the transmitter (if using a radio like the Spektrum DX6 or 7) or if using a lower specification transmitter that does not have this you will have to adjust it with the trims.
All that then remains is to check that all the controls are operating the swash in the correct directions and take a test flight to making any final adjustments to the trims.
So what was the cost of this?
BLH3505 Main Frame w/hardware £4.99
BLH3504 Landing Skid & Battery Mount £4.50
Total cost £9.49
I also fitted a new style tail rotor as mentioned before, BLH3603 £1.50
Now how does that compare with the cost of accident repairs on say a 450 size helicopter? Probably 5 to 10 times cheaper; plus there are alot less parts to break, it is very much more resilient to crashes and so much more straight forward to repair (if you can handle the tiny size of everything!). The only tool that I needed to use throughout was the provided jewellers screwdriver.
It is no wonder that these little micro-size 3D RC helicopters are becoming so popular!
So is the Blade mCPx the only real choice in this niche of the RC helicopter market!
Absolutely not. Here are 3 other major contenders from Walkera worthy of more than just serious consideration:
If there is one thing that has helped the hobby of flying RC helicopters
explode to its current popularity it has to be the develoment of the
LiPo battery, largely as the result of the drive to produce small light
rechargeable power sources for the mobile phone industry. With not only
their size and weight characteristics but also their power output and
storage capacity being very favourable for use in RC flying models,
where the power to weight ratio is so critical, everything was set for
electric powered models to make huge strides forward. Whilst the only
viable power source had been nitro/gas engines the hobby was always
going to remain limited to the more serious enthusiasts; largely because
of the generally perceived difficulty, messiness and expense of these
models. Furthermore, the required size and noise of these models
restricted when and where they could be used. With the rise of the LiPo
battery the way was paved for electric powered RC helicopters and planes
to rise to the fore and make the hobby much more widely accessible.
Once radio controlled helicopters were able to enter the toy market the
real surge in interest in the hobby side inevitably followed and from
that rise in popularity we have seen not only a much wider range of
manufacturers in the market but also manufacturers who have the
financial means to invest in driving technological developments forward
whilst dropping the prices of advanced products still further for the
consumer. So the benefits of the advent of the LiPo battery have been
wide ranging for the RC helicopter hobby.
Electric RC helicopters now have the power to perform the most amazing aerobatics even in large size models
LiPo’s, or more correctly Lithium Polymer,
batteries are the most common way today of powering electric RC models. Planes
and helicopters are biggest beneficiaries of the development of LiPo batteries
because they are very light in weight compared to the amount of energy they can
store. They also have high discharge rates compared to conventional
rechargeable batteries (NiCad or NiMH) enabling them to provide the huge bursts
of power required by high performance motors used in extreme flight manoeuvres.
It is the innovation of the LiPo rechargeable battery that has enabled electric
power to become so popular for RC helicopters, brought the cost down and opened
the wonders of flying RC helis to a much wider audience who would never
otherwise have entered the hobby.
The latest micro-technology together with the advent of LiPo batteries has enabled palm-sized Rc helicopters to be developed, now with highly agile performance, such as this 6-Channel RC helicopter from Walkera.
For all their advantages there are a few
downsides to LiPo’s; namely their relatively high price, whilst having a
lifespan that is quite limited. You need to care for them properly if you are
going to get even 300 – 400 cycles out of them. In order to do this you need a
little knowledge on how to care for them (another article needed for this). There
is a degree of hazard involved with LiPo’s, the volatile electrolytes have been
known to catch fire. This is not something that I would overplay but it is
something that you need to be aware of and should always be kept in mind.
The risk of LiPo fires are sometimes overplayed but it should never be forgotten!
There are a few numbers on LiPo batteries
that you need to particularly look out for, which determine its rating and
suitability for your particular model. The main ones are the batteries voltage
(V), its capacity (mAh) and its discharge rate or ‘C’ rating.
Confused by all the numbers listed for a LiPo?
So, the first of these – voltage (V). LiPo
battery packs are built up of cells each with a voltage of 3.7v. Those used in
radio controlled helicopters, planes and the likes will normally be 1 to 6
cells each of 3.7v. LiPo’s will normally state the number of cells (S) but do
not always show the voltage. So a 1S pack will be 3.7v, a 2S pack is 7.4v and a
3S pack 11.1v, right the way up to a 6S pack at 22.2v. Why is ‘S’ used to represent
the number of Cells? Well it is the number of cells in Series and ‘C’ is used
to represent the discharge rate. Ok, ‘C’ for Discharge rate! Makes sense! Well
actually there is sense in it as the discharge rate is a factor of the Capacity of the cell. This will all
become clearer later. If there are a number of cells in Parallel this will be given a ‘P’ number, but other than very large
capacity LiPo’s packs are usually 1P. So you might see “3S 2P” written on a
LiPo, indicating that there are 2 lots of 3 cells in series hooked up in
parallel.
The important
thing though with voltage is simply to ensure that you have the correct voltage
LiPo’s for your particular model. This will be determined by the motor and
speed controller combination of the model. You simply follow that. So if it
states you need an 11.1v 3S LiPo you get just that for your model. The capacity
and discharge rate of the LiPo’s can be easily varied but the voltage must be
right.
That then
leads nicely on to deal with LiPo capacity. This is usually given in mAh
(milliamp hours). This quantifies how many milliamps you could drain from it at
a constant rate for an hour in order to fully discharge the pack. Thus if you
could run a LiPo at 2200mA for an hour its capacity would be 2200mAh and it
would have twice the capacity of a LiPo that could run at only 1000mA for an
hour in order to completely drain it from fully charged. It is like the size of
the fuel tank in your car. Obviously the larger the capacity of your fuel tank,
or LiPo battery, the longer you can run for. With radio controlled models,
especially RC helicopters and planes, the limiting factor is the weight and
size of the battery pack. A larger capacity pack may give you longer flight
times but being heavier it will adversely affect performance.
So now for
the discharge rate (C). As noted before the ‘C’ is related to the capacity and
here is how. The C number represents how many times faster than the Capacity you can discharge the pack safely
at a constant rate. So a 2200mAh LiPo with a 20C rating can be safely
discharged at up to a sustained load of 44000milliamps (44amps). From this you
can also determine how long it would take to totally discharge the pack at that
load. Since the capacity of a pack is quantified by how many milliamps it will
take to totally discharge it in an hour, the time it will take to drain at the
C rate will be 1 hour, or 60 minutes, divided by the C value. So a 2200mAh pack
with a 20C rating would discharge in 3 minutes. In practice we never constantly
apply anything like these levels of sustained discharge so the flight times a
much longer.
Many packs
will now show two figures for the capacity, eg 20C/40C. The first of these
represents the constant discharge rate discussed above and the second the ‘burst
rate’. As you might guess from the name the burst rate denotes the discharge
rates for short bursts.
Some manoeuvres require short bursts of high power.
There are a
number of factors to keep in mind when selecting the C rating for your
batteries. Firstly it should be noted that in general the higher the discharge
rate the more expensive the LiPo, although the difference is getting less.
Secondly, you cannot use one that is too low; which would damage your pack and
quite possibly ESC. For beginners and light sport or scale flyers with RC helicopters
up to a 450 size 20-25C is ample. When you start doing more aggressive 3D
manoeuvres or using bigger helicopters you need to look at stepping up to 35-45C
rated packs. The best advice here though is that if you can afford to do so you
should go for a little more than you need. A LiPo pack running close to its
limits will get hot and this shortens its life. So you may pay more for a more
generous C rating but it is likely to last you longer. A tip here is to test
the temperature of your LiPo’s immediately after landing. If it is too warm to comfortably
hold tightly in your hands then the pack is getting too hot. This means that
either you need a higher C rated pack or your pack is getting old and needs replacing.
LiPo’s will
also be overheated by running them too long. Never ever run them to a
standstill. As they run down the voltage drops and the internal temperature rises,
with 3 volts per cell being the critical point at which they become overheated
and potentially damaged. Often quoted is the 20% golden rule. That is, you always
have 20% of the LiPo’s capacity remaining at the end of the flight (Sometimes
you will see this written as the 80% rule – obviously this being that you
should not drain more than 80% of the capacity). So a 2200mAh pack should always have a
minimum of 440mAh remaining. A good digital charger will show you these figures.
If you hook it up after a flight it will give you the capacity remaining in the
pack and you can also read the voltage of each individual cell. Alternatively
you can measure the voltage of the whole pack
with a digital voltage meter. Look for reading of more than 3.75 volts per cell
(ie 3.75 x the number of cells in the LiPo pack). So that would be 11.25v for a
3S pack.
Conversely,
at the other end of the scale you should never overcharge a LiPo. A 3.7 volt
per cell LiPo is fully charged when it reaches 4.2 volts. Beyond this again it
will overheat, shortening its lifespan and potentially they can set alight as the
electrolytes they contain are volatile. A good quality charger which measure
this and you will be safe so long as you set the correct number of cells or
voltage on the charger (the correct voltage to select will be 3.7 x the number of cells in the LiPo
pack).
It is also
important to get the charge rate correct in order to maximize the life of your
LiPo’s. Until recently this was always no more than the capacity of the LiPo
(So a 2200mAh LiPo could be safely charged at a current of 2200mA). Now an
increasing number of manufacturers are indicating that better quality packs can
be charged at rates of 2-3 times the capacity or even more in some cases. The
best advice here is to follow the advice given by the manufacturers of the
brand that you purchase. The advantage of course of charging at a higher rate (current)
is that the pack charges quicker; which equals less waiting time and more
flying time.
Next it is
important to balance a pack after charging. This ensures that every cell in a
multi-cell pack has the same voltage. Your charger reads the total voltage
across the whole pack, so that if it is set to charge a 3 cell pack it will
stop charging when the voltage reaches 12.6 volts (3 x 4.2 volts). Now obviously
that does not mean that each cell has 4.2 volts. One cell could have charged
faster than the other two and have reached a higher voltage, and as discussed
above it is critical that a cell does not get charged beyond 4.2 volts.
Therefore, the pack should be balanced using a balance board, or today many
better quality charges have a balance socket so that this can be done whilst
charging.
Charging using a 'blinky'
Alternatively, you can use a ‘blinky balancer’ which you can purchase
separately if your charger does not have the facility. Cheaper balance chargers achieve
the same effect through charging through the balance plug on the LiPo, but as
this has narrow gauge wire only capable of taking a low current charging has to
take place more slowly.
Charging through the balance plug
Finally a word on safe
charging. It is always stated that you should never leave a LiPo unattended
whilst it is charging. Since this is not very practical to stand watching them
the whole time the following safety precautions are recommended. Firstly, check
your LiPo’s regularly until the charge cycle is complete and never leave the
house (preferably stay in the same room) during this time. It would be courting
disaster to leave them whilst you go out and likewise do not go to bed with
them still on charge, even though you know your charger will stop when they are
completely charged. Charge your batteries in a fire proof container. The
purchase of charging bags is highly recommended. Preferably charge your LiPo’s
in a room fitted with a smoke alarm. Or even better buy one especially to site
above where you recharge your batteries.
Look after your LiPo’s and
they will repay you with good sustainedperformance
over a long period of time. Charge safely and you will enjoy many years of
flying.
The power of electric flight - go anywhere, anytime - and now even fly onboard with FPV