Saturday 31 December 2011

Blade mCPx: Further Adventures (or should that be 'Misdemeanours'!)

Well here in the midst of the British winter outdoor flying days have been few and far between...and on the few decent days we have had over the last few weeks it seems that I just haven't had the opportunity to get out flying - business takes priority this time of the year. Then add to that the short day length in the UK at this time of the year.

At last on Monday of this week I did manage to get the chance to pack my bag with the mCPx and Spektrum DX7 and head off down to the flying field and put a couple of packs of lipos through...yes, that reminds me - when it comes to lipos for the mCPx do invest in as many packs of the Turnigy nano-tech 300mAh 35C batteries as you can. They fit the Blade mCPx without modification, the extra capacity of the 300mAh gives you longer flight time and being 35C you get the extra zip you really need to get this little heli moving. It really is needed for 3D flying and really for any type of flying where you have wind to contend with. (If these figures leave you bemused then take a look at the RC Helicopter Fun website - it's loaded with information and he gives you easy to understand and in depth rundowns depending on the level you want. For the ABC on lipo batteries click HERE ).

It was not a still day by any means but we actually had some bright sunshine - not always helpful this time of the year as it is so low in the sky, so you have to keep it in mind when flying. One of the nice things about the mCPx for someone starting out with a collective pitch helicopter is the smooth transition when on standard setting between the 3 flight modes (if using a DX7). Of course its stability and resilience to crash impacts are huge reasons to favour it, plus the fact that it is generally just a great helicopter that no matter what you level of competence (once you have at least a small amount) you can always get something out of this little heli...and largely that something is loads of fun. Plus it is a heli that just grows with you as you grow with it.

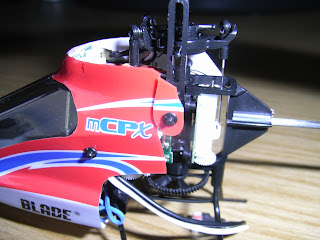
Now this day was one when i was going to test the resilience of the mCPx - not by design. Flying it round first getting the feel of it again after not having been out with it I thought I would have a go at some new inverted manoeuvres I have been practicing on the flight simulator - the result a couple of heavy power on impacts into the ground, fortunately nice soft grass after all the rain we have had. It is actually quite a smart move finding some grass to fly over when your starting or trying out something new. The result of the impacts, well it through the main gear as usual...just a push back on job and off we go again. The second impact did result in breaking the canopy and a piece came clean off, while part was retained by the canopy supports. Here are the pictures:

Right side: as it should be.
Left side: with the crash modification


You can see what a tidy job I made of the modification. I certainly shall not need to rush out to buy a order a new canopy...and it flies fine still, so no other damage done.

Back to the flight sim for more practice I think!!!

To finish this post off I thought I would just add a note on the importance of a correctly set up swash plate in order to get a collective pitch helicopter to be a pleasure to fly rather than a handful. Below are pictures taken of the 450 size helicopter I am finishing off show how a swash plate should look:

Low Stick Position - Swash at Lowest Point
Mid Stick - Swash at Middle of Range
High Stick position - Swash at Highest Point
Note how the swash plate is nice and level throughout the full range of its movement. Regardless of where the left throttle/pitch stick on the transmitter is the swash plate stays level as it moves up and down with the stick movements.

To finish off with...a teaser video...


Tuesday 27 December 2011

Wallkera V200D03: Binding Issues, Tail Set Up And More...


Well it has taken a long time to get around to getting any further with setting up the Walkera V200D03 and then more time to get a blog posted on it...the run up to Xmas is always a busy time in my industry and then as for the Xmas period itself, well say no more!!!


So, first off a report on the binding process of the V200D03 flybarless collective pitch helicopter. Everything in the manual tells you that you must always turn on the transmitter first, then plug in the helicopter battery within 10 seconds.Further the throttle stick and trim must be in the bottom position before powering up the helicopter. All standard procedure I am sure you will know. The only thing is that if you do that the receiver will not pair with the transmitter, well at least not for the initial binding.

What the instructions do not tell you is that for the initial binding procedure all the switches on the transmitter need to be either up (for those on the the Tx face) or back (for those on the top).

Then, most importantly you need to reverse the switch on order; so that is connect the battery on the helicopter and then turn on the transmitter.

Yes, I was a little hesitant and cautious about doing this even though I was reasonably confident that every indication is that this helicopter has a built in fail safe that does not allow power to the motor without a transmitter signal. Then, the Devo 8 takes its time powering on, unlike I am used to with the Spektrum DX7 which is almost instantaneous. So having waited this out, hey bingo! Pairing successfully completed.

So, that completed I could then move on to checking out the helicopter set up. Mostly it was fine and probably only needs fine tuning to my personal flying preferences. One thing that did strike me was that for just a small rudder command the tail servo was travelling to its full extent. Now the question is: is this the full range of travel of the servo or is its travel being limited by the physical range of travel of the tail rotor sliding sleeve. If this is the case it will be stalling the servo and placing a strain on it. Such loads can dramatically shorten the life of the servo. I must say that I could not hear the servo stalling even when full left or right rudder was applied from the transmitter.


The other issue with this is that this set up gives very sharp tail action for very small transmitter inputs. For this reason at least for initial flights while I see how this helicopter behaves in the air and to cover the possibility of servo stalling until I have checked this out further I prefer to adjust this.

There are a couple of options here:

  1. Through the receiver/gyro reduce the Rudder Ext. Adjusting it to the full -ve value lead to little difference to reducing the effect.
  2. In combination with 1, through the transmitter Servo Travel screen reduce the extent of the rudder travel. The value required to prevent the servo reaching its limit of travel by the tail rotor sliding sleeve was actually 30% left and right. This is a very low value and leads me to the conclusion that the servo is not stalling, Walkera would not set it up like that.
  3. Another option is to relocate the tail servo bell crank on the servo bell crank in a hole nearer the centre.
  4. A further approach is to add exponential to the rudder through the transmitter setup screen. This will not actually reduce the overall travel of the servo but it makes it less sensitive near the centre of the stick so that larger stick commands will be required to produce the same same movement.

 The final setup I chose here will take a little trail and error experimentation; and it is likely that it will be a combination of several of the above, at least 1, 2 and 4. I will just have to see how sharp the tail action is in flight and adjust accordingly. The problem with 2 above is that if you reduce the rudder servo travel too much through the transmitter it can make the servo movement very sluggish in some set ups.


Moving on:

Christmas is a time for giving so just a quick suggestion to remember those selflessly working at this time for us, especially those in the emergency and medical services. Many of us heli maniacs I know have an interest in air ambulance services, which are all funded by voluntary contributions from the public. It currently costs around £1000 a flight when one of these are called out and the work that these crews do is invaluable, so if in these thrifty times if you do have even a little to spare consider contributing it to a cause like this.

Alternatively, there are other ways that you can get involved with supporting your local  (or any regions for that matter) air ambulance service. Many R/C helicopter clubs are involved with raising funds in one way or another and some hold specific events to do so. One such, that you may consider getting involved with is the RCHA Fun Flyin' at Lincoln where they raise money for the Lincolnshire & Nottinghamshire Air Ambulance For the last two years they have attempted to break the world record for the most R/C helicopters hovering simultaneously. As far as I am aware they still have the Guinness Book of Records world record. It is a great fun day and very well attended, including by some very top names.

Here is a video from the 2011 event:


I will follow up with details of this years event when they become available.

Monday 5 December 2011

Walkera V200D03 - Setting Up The Devo 8 Transmitter


In the unboxing review of the Walkera V200 D03 I stated that I was going to report on how I found programming the Devention 8 transmitter included in the package. So, here is that rather overdue report.


The Devo 8 is really easy to programme. Everything is very intuitive and very easy to find. I was very pleased with the touch screen, it was sensitive enough without being over sensitive and it does make it much quicker and easier to navigate than conventional means via buttons or buttons and scrolling mechanisms.

Nearly everything was already set as per the V200 D03 manual. The setting programmed in give a good starting point for general flying and advanced aerobatics. From these they can be fine tuned to individual preference. They can be smoothed out to tame the helicopter down for novice pilots (together with adjustments made to the receiver/gyro unit) or it can be tuned up for more aggressive 3D flying. All the parameters that you want can be readily adjusted, and it is so easy to do so with the new touch screen.

The only settings that I initially changed were the Power Amplification (which was set to the maximum +20 dBm, where the manual recommends it to be set at 0 dBm), the sound (personal preference, I’m not a fan of it bleeping at me every time I press a button so I turned it off) and then finally I activated the throttle hold. As provided the transmitter is set up for the Rudder D/R switch to control the rudder dual rates. I changed it to operate the throttle hold. I like to have this function:

1)      for safety, so that I know I’m not going to power the main blades accidently at the wrong time
and
2)      if an RC helicopter crashes in idle up mode (Flight Modes 1 and 2, or stunt mode as it is otherwise known) then you want to quickly be able to cut the power to the rotors to minimise damage. Again, that is a personal choice but one that is widely followed.

A feature of the Devo 8 that I really love is the ability to change the gyro sensitivity at the flick of a switch. Above the cyclic (aileron/elevator) stick on the right side, by the Aileron Dual Rate Switch is a 3 position Mix Switch.
This allows you to select between 3 pre-set gyro sensitivity settings. These are factory set at:

·         Pos 0: 75%,
·         Pos 1: 70%,
·         Pos 2: 40%.

The higher the percentage the more sensitive the gyro is and the faster it will react to movements of the helicopter not resulting from stick inputs. Thus the lower the percentage the softer the response of the helicopter and the more stable it will be in the air. The beauty of this is that if for example the wind picks up you can easily reduce the gyro sensitivity to increase stability in the wind and make it more flyable.

 Alishanmao demonstrates use of Gyro Gain Switch in the wind

It also means that as your flying skills improve you do not necessarily have to start making adjustments to the receiver/gyro itself to allow you to progress to more agile helicopter performance – useful when you are transitioning, as you can try for a while with the helicopter flying in a more aggressive style and then flick it back to your usual more balanced position to recompose yourself; then have another go with it flying more agile.


The factory settings on the mix switch can be readily changed through the touch screen menus and the stability/agility of the helicopter is always a product of what is set in the transmitter and the settings made on the receiver/gyro itself. Thus if you increase the sensitivity on the gyro through the unit on the RC helicopter, Pos 0 will represent 75% of that, with Pos 1. 70% of that and Pos 2. 40%.


The beauty of a transmitter like this is that the permutations are endless and you can fine tune each helicopter to your individual preferences and flying style. The settings for each helicopter are then stored under a separate profile selectable from the touch screen menus.

It is a great transmitter for a great RC helicopter.

Have fun!